Starting Pumpkin and Winter Squash Seeds Indoors

Some of the links on this website are affiliate links, which means that if you make a purchase through these links, I may earn a small commission at no additional cost to you. As an Amazon Associate, I earn from qualifying purchases. I only recommend products I genuinely trust and believe will bring value to my readers. Also, some of the content was created with strategic use of AI tools. For more information, please visit the Privacy Policy page. Thank you for supporting my blog and helping me continue to provide valuable content. Gardening is more than growing food—it's where God grows us. If you're hungry for a faith that feels grounded again, I wrote a book for you. Download my free eBook: Rooted in Grace: A Christian Guide to Intuitive Gardening
“`html
Starting Pumpkin and Winter Squash Seeds Indoors: A Southern Gardener’s Secret to Early Harvests 🎃
Every spring, like clockwork, I get giddy about starting seeds indoors—especially for heavy hitters like pumpkins and winter squash. These gorgeous garden giants need a long growing season to reach their full potential, and if you live in a warm climate like Zone 9, giving them a head start indoors is one of the best things you can do for a bountiful fall harvest.
Here in the Houston suburbs, where our summers are intense and our fall window is precious, timing is everything. Start too early, and your squash seedlings will outgrow their pots before the soil is warm enough to transplant. Start too late, and you’ll be racing against our first frost in November. There’s a sweet spot—and I’m here to help you find it.
In this guide, I’ll walk you through every step of the process, from picking the right varieties to transplanting your starts without a hiccup. Along the way, I’ll share the intuitive gardening approach that’s served me well: observe what your seedlings are telling you, reflect on their needs, and respond faithfully with care. Let’s grow something beautiful together. 🌱
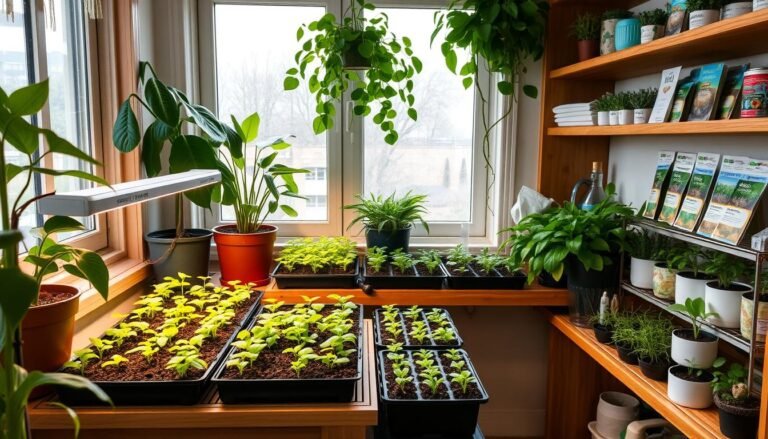
🧰 Tools and Supplies: What You Actually Need
You don’t need a fancy setup to start pumpkins indoors, but a few key tools make the job easier—and more successful. I’ve learned this over years of both over-complicating things and then simplifying them down to what really matters.
🌟 Seed Starting Essentials
| Item | Why It Matters | Zone 9 Notes |
|---|---|---|
| Seed trays with domes | Keeps humidity in while seeds germinate | Essential—our dry spring air works against you |
| Organic seed starting mix | Light + fluffy = better root development | Avoid garden soil; it compacts and holds heat |
| Pumpkin + squash seeds | Choose varieties suited to your timeline | See recommended varieties below |
| Grow lights | Mimics sun, prevents leggy seedlings | Even in spring, indoor light isn’t enough |
| Heat mat (optional but helpful) | Boosts germination speed and uniformity | Speeds things up—useful in early March |
| Waterproof labels + pen | Don’t lose track of what’s what | Seriously—label everything! |
| Spray bottle or misting can | Gentle hydration during early stages | Better than watering from above |
Related reading: How to Care for Seedlings under Grow Lights, Thinning Seedlings the Right Way, Year-Round Seed Starting in Zone 9
📆 When to Start Pumpkin Seeds Indoors: The Zone 9 Timeline
Pumpkins and winter squash are sensitive to cold and don’t like being rushed. This is one of those lessons I’ve learned the hard way—more than once! 🤦♀️ Start them too early and they’ll get root-bound in their pots, stressed and spindly. Start them too late and you’ll miss out on a full harvest window before November frost sets in.
Here’s what I’ve found works best for our Zone 9 garden:
| Action | Timing (Zone 9/Houston Area) | Why This Matters |
|---|---|---|
| Start seeds indoors | March 20 – April 10 | Gives seedlings 4–5 weeks before transplant |
| Begin hardening off | April 20 – April 28 | Acclimate to outdoor temps gradually |
| Transplant outdoors | April 25 – May 5 | Soil temps 65°F+; frost danger past |
💧 Sanda’s Zone 9 Note: Use a soil thermometer to check ground temps at planting depth—your squash will thank you! I keep mine in a garden drawer right next to my seed packets. When that soil hits 65°F consistently, you’re good to go. Before that, even established seedlings will sulk and stall.
🌿 Choosing the Right Varieties for Our Climate
Not all pumpkins and squash are created equal when it comes to Houston’s heat and humidity. Here are some tried-and-true varieties that thrive in Zone 9:
For Pumpkins: ‘Gladiator’ (excellent disease resistance), ‘Howden’ (classic carving pumpkin, reliable), ‘Sugar Pie’ (smaller, sweeter for cooking)
For Winter Squash: ‘Butternut’ (heat tolerant, stores well), ‘Delicata’ (faster maturing—85 days), ‘Kabocha’ (thrives in humidity if given good air circulation)
The key is choosing varieties with slightly shorter days-to-maturity when possible. Our growing season is long, but our late-summer humidity can invite powdery mildew and other fungal issues. Varieties that mature by late September or early October give you a better safety net. 🎃
🪴 Step-by-Step: How to Start Pumpkin & Squash Seeds Indoors
Step 1: Prep Your Mix 💚
Start with pre-moistened seed starting mix—light, airy, and sterile. This is not the time to grab that bag of garden soil from last year. I learned this lesson the hard way with damping off (a fungal issue that kills seedlings). Good seed starting mix is worth every penny because it drains well, holds just enough moisture, and won’t introduce diseases to your tiny, vulnerable seedlings.
Wet your mix thoroughly the evening before planting. Let it sit overnight so the moisture distributes evenly. Dry mix, when you add water later, can create air pockets and uneven watering patterns that stress seeds.
Step 2: Plant Your Seeds 🌱
Here’s where observation starts: pumpkin and squash seeds are large enough to handle individually, and they’re forgiving about depth. Here’s what works:
Sow 1–2 seeds per pot, pushed about 1 inch deep into the moist mix. I prefer 4-inch pots (or those square seedling pots) because these plants grow fast and need room. A too-small pot means you’ll be transplanting earlier than ideal, which stresses the plant.
Cover lightly with mix, and label each pot immediately. I use waterproof labels and a permanent marker because nothing is more frustrating than not knowing which variety you’re growing in June!
Step 3: Warm It Up ☀️
Place your trays on a heat mat or in the warmest spot you have—ideally 70–85°F. This is where pumpkin and squash seeds really sing. They’ll germinate much faster with consistent warmth than at room temperature. I set mine on a heat mat in my utility room, and seeds typically sprout within 5–7 days.
If you don’t have a heat mat, a sunny south-facing windowsill or the top of the refrigerator can work, though germination will be slower.
Step 4: Keep Them Cozy 💧
Use a humidity dome or clear plastic wrap over your trays. This keeps the moisture in and creates a little greenhouse effect while seeds are germinating. The moment you see the first sprout breaking soil, remove the dome or plastic. Too much moisture after sprouting invites fungal issues.
Step 5: Light Matters (And It Really Does!) 💡
Once they sprout, move seedlings under grow lights immediately. Run lights for 12–16 hours per day, positioned about 2–3 inches above the seedling tops. No window—not even a south-facing one—gives enough consistent light for strong seedling growth indoors.
Without adequate light, seedlings stretch and become leggy, trying to reach for the sun. You’ll end up with tall, weak stems that flop over when transplanted. Trust me, it’s better to invest in a simple grow light setup now than to battle weak transplants later.
Step 6: Water Gently 💧
This is where intuitive gardening comes in. Instead of a watering can from above, use a spray bottle or misting can to keep soil moist—not soggy. Feel the soil with your finger. It should be like a wrung-out sponge: damp, but not waterlogged.
Soggy soil + seeds = rot. Dry soil = slow germination. The middle path is where the magic happens. Check daily, especially once seedlings are up and growing fast.
Step 7: Thin to the Strongest 🌿
Once you see the first true leaves (the second set of leaves that appear, which actually look like tiny squash leaves), it’s time to choose a champion. If you planted 2 seeds per pot and both germinated, snip the weaker seedling at soil level with small scissors. Don’t pull it out—this can disturb the roots of the stronger plant.
Yes, it feels wasteful. But one strong plant is infinitely better than two stunted ones competing for nutrients and space
🌿 Ready to Go Deeper in the Garden?
If this article resonated with you, you might be ready for something more than tips — you might be ready for
a whole new way of seeing your garden.
- 📖 Download the FREE Rooted in Grace eBook — Intuitive gardening for the faith-filled suburban gardener.
- 📚 Get the Rooted in Grace Print Book on Amazon — A beautiful companion for your garden journal.
- 🌱 Join Rooted Reset — A 5-day gentle reset to slow down, pay attention, and tend what matters most.
- 📌 Follow @southernsoils on Instagram — Daily garden encouragement in your feed.
- 📌 Save & share on Pinterest — Pin this for later and share it with a gardening friend.
- 👥 Join us on Facebook — Connect with a community of faith-filled gardeners.
“The garden is not just a place to grow plants — it is a place to grow yourself.” 🌸