
How to Care for Seedlings Under Grow Lights: A Beginner’s Guide

Some of the links on this website are affiliate links, which means that if you make a purchase through these links, I may earn a small commission at no additional cost to you. As an Amazon Associate, I earn from qualifying purchases. I only recommend products I genuinely trust and believe will bring value to my readers. Also, some of the content was created with strategic use of AI tools. For more information, please visit the Privacy Policy page. Thank you for supporting my blog and helping me continue to provide valuable content. Gardening is more than growing food—it's where God grows us. If you're hungry for a faith that feels grounded again, I wrote a book for you. Download my free eBook: Rooted in Grace: A Christian Guide to Intuitive Gardening
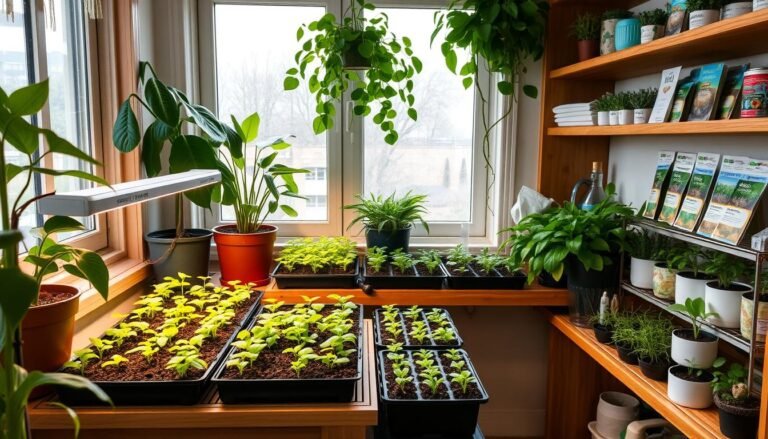
Caring for seedlings under grow lights might seem intimidating at first, but it’s a straightforward process once the basics are understood. Proper lighting, watering, and monitoring ensure strong, healthy plants that are ready to thrive outdoors. This guide walks through everything a beginner needs to know, step by step.
Step 1: Set Up the Perfect Environment
Choose the Right Grow Light
The type of grow light can make a big difference in the success of seedlings. For beginners, LED or fluorescent grow lights are excellent options. LEDs are energy-efficient and long-lasting, while fluorescent lights are budget-friendly and easy to use. Avoid incandescent bulbs, as they produce too much heat and are not suitable for seedlings.
Position the Lights Correctly
Position the lights 2-4 inches above the seedlings for fluorescent lights and slightly farther for LEDs, depending on the intensity. The lights should be adjustable so they can be raised as the seedlings grow. Proper positioning prevents leggy growth and ensures that plants receive the light they need.
Step 2: Provide the Right Amount of Light
Seedlings need consistent light to thrive. Aim for 12-16 hours of light daily, simulating a full day of sunlight. Using a timer can make this process simple and ensure a consistent schedule.
Signs of Light Issues:
- Too Little Light: Seedlings become leggy, with long, weak stems.
- Too Much Light: Leaves may appear burnt or dry.
Step 3: Watering Seedlings Without Overdoing It
Watering is one of the most common challenges for beginners. Seedlings under grow lights may dry out faster due to increased evaporation. The key is to keep the soil moist but not soggy.
Watering Tips:
- Water from the bottom by placing seed trays in a shallow dish of water. This prevents diseases like damping-off.
- Use a spray bottle for light surface watering if needed.
- Remove excess water from trays to avoid waterlogging.
Step 4: Feed Seedlings Properly
Seedlings require nutrients once they develop their first true leaves. Start feeding them with a diluted, seedling-friendly fertilizer. A water-soluble fertilizer with balanced nutrients (e.g., 10-10-10) works well.
How to Feed Seedlings:
- Mix fertilizer at half the recommended strength for young seedlings.
- Feed every 7-10 days to promote steady growth.
Step 5: Maintain Proper Air Circulation and Temperature
Good airflow prevents mold and diseases while also strengthening the seedlings. A small fan set to low speed can gently circulate air around the seedlings. This mimics outdoor breezes, encouraging sturdier stems.
Temperature Tips:
- Seedlings prefer temperatures between 65°F and 75°F.
- Avoid placing them near drafts or heat sources that could cause stress.
Step 6: Monitor Growth and Make Adjustments
Regular monitoring helps catch issues early. Check the seedlings daily for signs of stress, such as yellowing leaves, leggy growth, or wilting. Adjust light placement, watering, or feeding as needed.
When to Transplant Seedlings:
- Transplant to larger pots when roots begin to outgrow the current container.
- Thin overcrowded seedlings to give each one enough space to grow.
Step 7: Harden Off Seedlings Before Planting Outdoors
Before moving seedlings outdoors, they need to acclimate to the natural environment. This process, called hardening off, reduces transplant shock and prepares them for outdoor conditions.
Hardening Off Steps:
- Start by placing seedlings outside in a shaded area for a few hours each day.
- Gradually increase exposure to sunlight and outdoor temperatures over 7-10 days.
- Avoid leaving them out during extreme weather conditions.
Troubleshooting Common Challenges
Damping-Off Disease:
This fungal disease causes seedlings to collapse at the soil line. Prevent it by avoiding overwatering and ensuring proper airflow.
Leggy Seedlings:
This issue often occurs when lights are too far from seedlings. Adjust the distance and ensure adequate light duration.
Yellowing Leaves:
Yellow leaves may indicate nutrient deficiency or overwatering. Check the soil moisture and consider feeding with a diluted fertilizer.
Recommended Tools for Success
- Adjustable LED grow lights for seedlings.
- Seedling trays with humidity domes.
- Timers for grow lights.
- Small fans for airflow.
- Liquid seedling fertilizer.
Final Thoughts
Caring for seedlings under grow lights is an essential step for successful gardening, especially for those starting seeds indoors. By providing the right light, water, nutrients, and environment, even beginners can grow healthy, robust seedlings ready to thrive in the garden. Follow these steps, stay observant, and enjoy the satisfaction of growing strong, healthy plants from seed.
Check out our guide on Starting Seeds Indoors to learn how to set up your seed-starting station from scratch!
Looking for high-quality, non-GMO seeds for your garden? 🌱🌿 Shop at SeedsNow for a wide selection of heirloom vegetable, herb, and flower seeds perfect for every gardener—from beginners to experts. These seeds are fresh, reliable, and ideal for organic gardening. Click below to start growing your best garden yet! 🌼🍅🥕


One Comment