
How to Grow Garlic in Zone 9: A Comprehensive Guide
Some of the links on this website are affiliate links, which means that if you make a purchase through these links, I may earn a small commission at no additional cost to you. As an Amazon Associate, I earn from qualifying purchases. I only recommend products I genuinely trust and believe will bring value to my readers. Also, some of the content was created with strategic use of AI tools. For more information, please visit the Privacy Policy page. Thank you for supporting my blog and helping me continue to provide valuable content. Gardening is more than growing food—it's where God grows us. If you're hungry for a faith that feels grounded again, I wrote a book for you. Download my free eBook: Rooted in Grace: A Christian Guide to Intuitive Gardening
Introduction
Garlic is a kitchen staple and a gardener’s favorite for its versatility, flavor, and health benefits. Growing garlic in Zone 9 is particularly rewarding because of the mild winters and long growing seasons. Whether you’re a seasoned gardener or a beginner, garlic is one of the easiest crops to grow with proper planning and care. In this guide, we’ll cover everything you need to know about growing garlic in Zone 9, from choosing the right variety to harvesting your flavorful bulbs.
Quick Tip: Garlic requires a bit of patience, but the payoff is worth it. You’ll plant in the fall and harvest the following summer. Ready to dig in? Let’s get started!

Understanding Garlic Varieties
Before planting, it’s essential to select the right garlic variety for your climate and culinary preferences. Garlic generally falls into two categories:
| Type | Description | Recommended Varieties for Zone 9 |
|---|---|---|
| Softneck | Best suited for warmer climates, softneck garlic is easy to braid and stores well. It has a milder flavor compared to hardneck varieties. | California Early, Silverskin |
| Hardneck | Produces scapes (edible flower stalks) and has a more robust flavor. Hardneck garlic prefers cooler winters but can still thrive in Zone 9 with proper care. | Chesnok Red, Purple Stripe |
Purchase high-quality garlic seed bulbs from trusted suppliers like Seed Savers Exchange or Johnny’s Selected Seeds.
When to Plant Garlic in Zone 9
Garlic is a long-season crop that thrives when planted in the fall, allowing the bulbs to develop roots during the cool months and grow vigorously in the spring.
- Best Planting Time: Late October to early December
- Why Fall Planting? Garlic needs a period of cold weather (vernalization) to develop large, healthy bulbs. The mild winters in Zone 9 provide the perfect conditions for this.
Preparing Your Soil
Garlic thrives in loose, well-draining soil with plenty of organic matter. Preparing your soil before planting is crucial for a successful harvest.
| Soil Requirement | Details |
|---|---|
| pH Level | 6.0 to 7.0 |
| Soil Texture | Sandy loam or well-draining garden soil enriched with compost |
| Organic Matter | Incorporate compost, aged manure, or organic fertilizer like Espoma Garden-Tone |
| Drainage | Avoid soggy soil to prevent rot. Raised beds are ideal for improving drainage in heavy clay soils. |
Check out our Soil Health for Suburban Gardens for more tips on soil preparation.
How to Plant Garlic
- Break the Bulbs: Separate the garlic bulb into individual cloves. Keep the papery skin intact.
- Select the Best Cloves: Choose the largest, healthiest cloves for planting. Avoid any that are soft, damaged, or moldy.
- Planting Depth: Plant each clove 2 inches deep with the pointed end facing up.
- Spacing: Space cloves 6 inches apart in rows that are 12 inches apart.
- Mulching: Cover the planting area with a thick layer of mulch (e.g., straw, leaves) to regulate soil temperature and retain moisture.
Pro Tip: Use a dibber or a small trowel for precise planting. Garlic thrives in well-spaced, airy conditions.
Watering and Fertilizing Garlic
- Watering: Keep the soil consistently moist but not waterlogged. Reduce watering as the bulbs mature in late spring to prevent rot.
- Use drip irrigation for consistent moisture levels.

- Fertilizing Schedule: Timing Fertilizer Type Application Notes At Planting High phosphorus fertilizer (bone meal) Incorporate into the soil before planting cloves. Early Spring Nitrogen-rich fertilizer (blood meal, compost tea) Apply as top dressing to encourage leafy growth. Mid-Spring Balanced fertilizer (e.g., 10-10-10) Stop fertilizing once bulbs begin to swell.
Common Garlic Growing Pitfalls
Growing garlic is straightforward, but there are some challenges to watch out for:
| Problem | Cause | Solution |
|---|---|---|
| Small Bulbs | Insufficient cold period | Plant earlier in the fall for better vernalization. |
| Yellowing Leaves | Nitrogen deficiency or overwatering | Add nitrogen-rich fertilizer and ensure proper drainage. |
| Rotting Bulbs | Waterlogged soil | Improve drainage with raised beds or sandy loam soil. |
| Poor Germination | Old or low-quality seed bulbs | Purchase fresh seed garlic from reputable suppliers. |
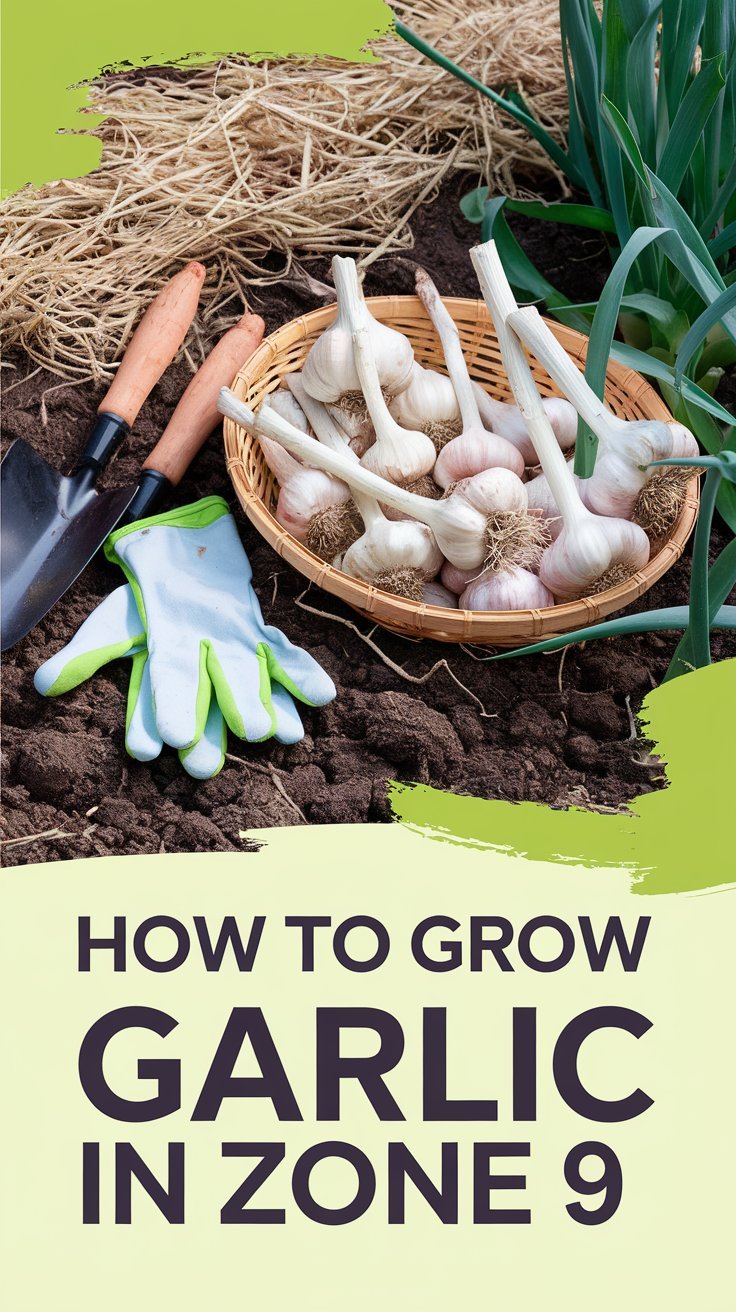
When and How to Harvest Garlic
Garlic is typically ready to harvest in late spring to early summer, depending on the variety and planting time.
- Signs of Maturity: Garlic is ready to harvest when the lower leaves turn brown but 5-6 green leaves remain.
- Harvesting: Use a garden fork to gently loosen the soil and lift the bulbs. Avoid pulling by hand to prevent damage.
- Curing: Hang garlic bulbs in a cool, dry, and well-ventilated area for 2-3 weeks. This process enhances flavor and increases storage life.
- Storage: Store cured garlic in a cool, dark place. Softneck garlic can last up to 8 months, while hardneck varieties last 4-6 months.
Companion Planting with Garlic
Garlic is an excellent companion plant due to its natural pest-repelling properties.
| Good Companions | Why? |
|---|---|
| Carrots | Garlic deters carrot flies. |
| Lettuce | Protects from aphids and pests. |
| Tomatoes | Repels spider mites. |
| Roses | Discourages aphids and fungal diseases. |
Learn more in our Companion Planting Guide for Zone 9 Gardens.
Garlic Growing Timeline for Zone 9
| Task | Timing |
|---|---|
| Prepare Soil | Late October |
| Plant Cloves | Late October to Early December |
| Mulch | After Planting |
| Fertilize (Nitrogen) | Early Spring (February-March) |
| Reduce Watering | Late Spring |
| Harvest | Late May to Early June |
| Cure and Store | June |
Visual Suggestions
- Feature Image: A freshly harvested bundle of garlic hanging to cure.
- Process Images:
- Breaking apart garlic bulbs into cloves.
- Planting garlic cloves in well-spaced rows.
- Mulching over the garlic bed.
- Close-up of garlic leaves turning brown before harvest.
- Infographic: Garlic growing timeline for Zone 9.
Conclusion
Growing garlic in Zone 9 is a rewarding experience that provides you with fresh, flavorful bulbs for months to come. By following this guide, you’ll set yourself up for success from planting to harvest. Whether you’re growing softneck garlic for storage or hardneck varieties for their bold flavor, this versatile crop is a must-have for any home garden. Ready to start your garlic-growing journey? Stock up on seed garlic and tools today and enjoy the satisfaction of homegrown garlic!
To get inspired, check out some interesting recipes featuring garlic in our post, 15 Unique Garlic Recipes You Must Try.
Have you grown garlic before? Share your tips and favorite varieties in the comments below!


One Comment